Knee Replacement E-Book
Total Knee Replacement
Note: Knee replacement may not be necessary. The last 4 patients that we sent to the surgeon who replaced my wife's both knees, they all were sent home with the fact they didn't need surgery at least at that time.
Unfortunately shots can come into the picture and they in most cases are short lived.
My wife's situation and replacement was the result of 2 very serious falls on both of her knees and arthritis taking over.
We had one surgeon that questioned in my case regarding my legs etc. where even arthroscopic work could place me in worse condition than if I did anything at all. His suggestion was to try physical therapy to build up the peripheral areas around and supporting the knee/knees, as in many cases this is the underlying problem. Before you jump into the fry pan you owe it to yourself to self heal yourself but you can't do it by sitting on your rear.
Interesting theory
Last with all of the theories I recently decided to go to a local Chiropractor to treat a lower back problem and in the process discussed my leg issues. The numbing underneath the knees all around to the calves on both legs led to a questioning by the Doctor. He asked me two pertinent questions, the first was whether the problem was symmetrical being both sides of my lower extremities. The answer was yes and I could only answer that question after the symptoms of my fall in the kitchen and my right leg issues had subsided. This took over a year. The second question was when I encountered discomfort in my legs and back if it was relieved in just a matter of seconds after sitting down. The answer was yes. I was astonished that the Doctor with these two answers in hand came to an immediate conclusion that my problem or at least the cause of my symptoms were Spinal and in most cases was a slam dunk indication of spinal stenosis. In my case he believed it was a lumbar stenosis problem, the lower area of the spine.
Unfortunately it is not easy to consider that when you have symptoms in one area that you may have to concurrently address other areas that could be the underlying causes. On the same token when you have consequences such as nerve damage in your legs and feet from an underlying problem in your spine, you cannot rely and address the underlying cause only.
In my particular case I am addressing my spinal issue with Chiropractic but at the same time conscious of the fact that I have to address the other areas that have suffered.
Muscles
It was also discovered that I had very tight muscles on the outside of my legs and in the process developed a serious weakness in the inside areas of my legs. This condition unfortunately created an imbalance and in addition had a negative effect on the communications between my brain and the feet therefore depriving my legs with adequate blood, lymph and electrical circulation. Not having good circulation in your legs definitely has a negative effect on your skeletal and the knees and hips seem to take the biggest hits.
We are in the process in doing various therapies for my legs, a home electrical stimulation process called the Rebuilder and a home Ultra Sound device called the Xyliss. A quick Internet search will bring either one up. Going to a therapist periodically doesn't seem to be enough and although most therapists frown on home devices you may get lucky and find a professional that would work with you on home therapy along with visits.
I use a lymphatic brush on my legs in a very careful manner as encouraging lymph fluid to move in the superficial areas by brushing toward the heart is very beneficial.
Exercise
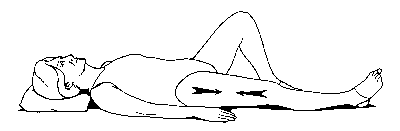
I also have a regimen every day in the morning before I eat, a good half hour of various exercises and stretches. Most of these recommendations came from the professional people I consulted with. We use many exercises that gently stretch the various nerves the sciatica nerves in particular that have gone down hill over the years. Walking every day even a couple of blocks is very important and doing it with good posture as well as deep breathing will go a long way in the rehab process.
Opinions
Here is where second and third opinions are necessary. If you go to the first surgeon that believes you can escape replacement or even arthroscopic work for a long period, you may decide to rely on that one and only opinion.
If you go to the first surgeon and they want to replace your knee/knees and you don't seek a second and third opinion, have your head examined not your knees.
How you go about your daily
chores in lieu of surgery and how you observe in home rehab (discussed in this feature
that applies to after surgery) will
most likely determine when and whether you will ever need intervention.
The biggest hurdle is to dedicate the time and effort to avoid the knife and that includes interpretation as to what could be causing unusual soreness in different areas. In some cases engaging in exercise equipment and different exercises can actually cause discomfort in itself and this can easily be misconstrued as an underlying chronic long term problem, when it really isn't. I found this out when I thought my problem was the after effects from an accident on my left knee but after a period of time and doing some serious in home therapy developed a symmetrical condition under both of my knees that had to discount the effects from the left knee involvement.
You have to make your own observations and try to relay it on to a medical professional, but don't count on them solving your problem. Things are just too complicated with all due respect to the medical community.
For those who are contemplating Knee Replacement.
(and are convinced that you need it done)
It is a big decision.
Is the family ready for those who choose replacement?
The problems and issues of after care starting post surgery were significant and we are writing this feature to help anyone prepare for this major operation.
My wife going through two total knee replacements one year apart and after care was an unbelievable experience for my wife and I. Keep in mind we ran a 200 acre farm with two roadside markets, 60 to 80 people employed. We know how to run things. I personally was flabbergasted by the amount of details I had on my shoulders for 2 weeks until my wife was able to get around a little. Burdening an old spouse with this process could be a foolish mistake, although I was able to call on all the faculties I had mustered over 40 years of business and did the job. Mission accomplished. She is doing great.
The Healing Process
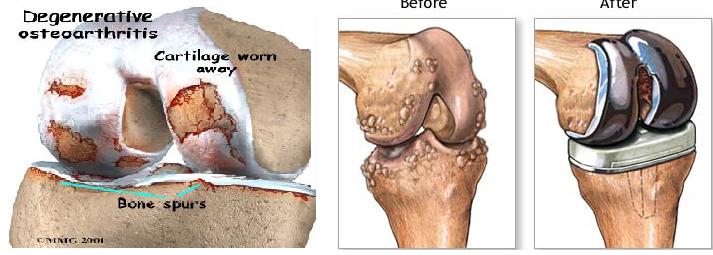
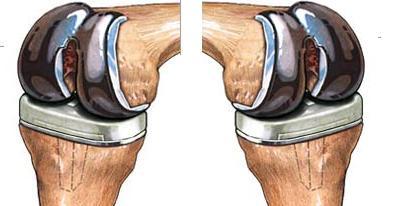
When you completely sever the bones (top and bottom) and replace it with an artificial prosthesis as pictured above, you invade many areas of tissue etc. and the healing process is long.
There is also a very serious scar tissue issue internally that develops, that requires diligent rehab at home and eventually at a rehab center.
The Mean Old Surgeon
We had the surgeon come in the day after surgery and we thought brutally pressed down on both sides of the knee to "demonstrate" what we the family needed to do on a regular basis to straighten out the knee (the extension) and not have it lock into a permanent undesirable restrictive position from the gitgo. I came to the conclusion that the surgeon was taking that opportunity to actually effect a beneficial post op next day procedure.
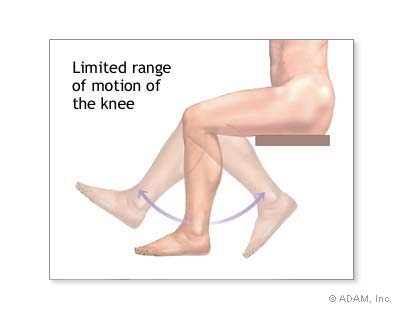
Extension and Flexion
The illustrations below indicates the patients critical goal in straightening out the knee for a full 0 degree extension. In addition, bending of the leg past the 90 degree normal sitting position to approximately 120 degrees is desirable, but not always achievable. My wife at the end of her outpatient therapy on the first knee got to about 110 degrees flexion and pretty close to zero extension. We expect to do as well or better on the second knee as we are presently in the rehab process of the second knee.
 Acceptable
straightening (extension) and bending (flexion) is critical in a successful knee
replacement. I believe that it goes further than mobility, I think that it
is imperative to the health of the area, hips, lymph and venous
circulation to
achieve the desired ranges of these two milestones, as the longer you wait
to do it, the harder it is to gain the optimum. A knee or knees that are
not brought to close to an optimum flex and extension will haunt you for the rest of your
life. Grit your teeth. Do what you are told to do.
Acceptable
straightening (extension) and bending (flexion) is critical in a successful knee
replacement. I believe that it goes further than mobility, I think that it
is imperative to the health of the area, hips, lymph and venous
circulation to
achieve the desired ranges of these two milestones, as the longer you wait
to do it, the harder it is to gain the optimum. A knee or knees that are
not brought to close to an optimum flex and extension will haunt you for the rest of your
life. Grit your teeth. Do what you are told to do.
The Deer in the headlights
 We
are not doing this feature to be critical of anyone involved with our case.
There is a lot to be desired though regarding the organization of this process
and we personally take most of the responsibility for not organizing and
orchestrating a smoother process, by not doing our homework before the process.
You can't get away with breaking the law if you claim ignorance. Is there any
difference between getting caught at an intersection breaking the law and
claiming ignorance of the situation and claiming ignorance when it comes to the
welfare of a loved one?
We
are not doing this feature to be critical of anyone involved with our case.
There is a lot to be desired though regarding the organization of this process
and we personally take most of the responsibility for not organizing and
orchestrating a smoother process, by not doing our homework before the process.
You can't get away with breaking the law if you claim ignorance. Is there any
difference between getting caught at an intersection breaking the law and
claiming ignorance of the situation and claiming ignorance when it comes to the
welfare of a loved one?
More Homework and Home?
This feature will start you off with some homework and we only wish we could have landed on something like this feature before we started. In other words don't stand around like the deer in the headlights and expect the very seriously overburdened medical system we have, the best on this earth to burn the midnight oil for you.
We were in one of the better hospitals in South Florida, but the rooms they put knee replacement patients in post-op are regular hospital rooms with a limited amount of expertise from the nursing staff in regard to knee replacement post care. These rooms are geared for post op patients and the staffs role is to keep them from pain, infection and really keep them alive as in preventing deadly blood clots. Unless you are in a very special big buck hospital don't expect to get the very best in post op therapy in the first few days after your operation.
Insurance
There has been a change in the entitlement format. Where most knee replacement patients before were sent to the hospital rehab area a day or two after surgery, now there has to be medical concerns that qualify a patient for in hospital rehab. Hospital rehab is another area of the hospital, where you are moved permanently too, not toggled back and forth from your regular hospital room. We believe on a 24 hour basis with the expertise in this area, it is a much better prepared area to handle post op replacement patients at least as far as knee therapy. When you are expecting a knee replacement check out the policy of the hospital regarding post op rehab. I am talking the first couple of days.
Lets get outa here!
The only problem is after about a day after surgery and most patients standing on their own two feet to some degree they are looking to go home with their dog and their own bed and hoping that what they face at home will not be a nightmare, because it could very well be a nightmare if you do not have a little army of people there to help you. Your caretaker spouse wants to be in good shape as well. I personally lost 5 lbs taking care of my wife in the first week.
Get Ready!
Make sure when you get up in the morning if you are the caregiver to put on the best pair of shoes you have and invest in Dr. Scholls inserts as well. Don't walk around in your slippers or flip flops.
There are cases where the surgeon and social services may not feel comfortable with the perceived caliber of care at home and encourage some time in the hospital rehab. It really is on a case by case basis.
There are independent care services that come to the home that are not covered by insurance, although nursing and therapists are covered at least for Medicare patients. They will be at your home the day after you arrive and the nurse in particular will be into see you everyday for a couple of weeks. The therapists usually take the weekends off and give you some homework that most patients slack off of. Not smart slacking off. There is a social worker that is deployed to see you the day after the operation. If some one doesn't show up, raise the devil.
Cushion your feet before it is too late
 One
more thing in preparing in advance and that is cushioning your feet on tile and
any hard surface. We had a Romanian tile setter that told us after
he got done doing tile work for us. "Get a pair of comfortable easy to get
into shoes/slippers, because if you don't this tile will kill your legs and in
particular your knees" That was 20 years ago and my wife and I have
been walking on our tile most of the time in our stocking feet. Don't let that
happen to you. Learn from our mistakes. In fact after you have your
knee or knees replaced it would be a good idea to continue using this principle
and that goes for general foot wear. Change those sneakers more often for
instance. Think about some of those Dr. Scholl's inserts even in a good
pair of sneakers. If you can find a good podiatrist it could pay off
having some professional inserts molded for your feet.
One
more thing in preparing in advance and that is cushioning your feet on tile and
any hard surface. We had a Romanian tile setter that told us after
he got done doing tile work for us. "Get a pair of comfortable easy to get
into shoes/slippers, because if you don't this tile will kill your legs and in
particular your knees" That was 20 years ago and my wife and I have
been walking on our tile most of the time in our stocking feet. Don't let that
happen to you. Learn from our mistakes. In fact after you have your
knee or knees replaced it would be a good idea to continue using this principle
and that goes for general foot wear. Change those sneakers more often for
instance. Think about some of those Dr. Scholl's inserts even in a good
pair of sneakers. If you can find a good podiatrist it could pay off
having some professional inserts molded for your feet.
In fact after knee replacement it is critical that all of your foot wear is up to snuff. Keep in mind knee replacements may not be forever. You hear on TV Attorneys looking for patients who have failed hip and knee replacements. I believe you can preserve the replacement for the rest of your life with proper foot ware, if you play some tennis confine it to clay courts as my wife does and daily exercise like a recumbent bike as covered below to keep the surrounding support areas around the knee loose and healthy. Check with a good therapist regarding stretching exercise. Muscle imbalance is another issue that can be countered with the right exercise regimen, walking is one of the best practices to balance your muscles in your legs and hips.
How about your protein intake? If you are not allergic to milk a good milk whey product should be added to the diet. I personally have two glasses of orange juice and water (half and half with a big scoop of whey protein split up in the morning. In addition we put 2 big scoops of whey protein in our daily smoothie. Of course protein is a vital part of the 40-30-30 diet that we subscribe to. Sardines by the way are a great source of protein along with all their other attributes, Vitamin D3, Calcium and Omega 3 fatty acids. I use a full can of sardines about 4 ounces in a salad or even in a bowl of Progresso clam chowder.
Take care of those legs, knees etc. whether they are your own or prosthetics. They wear out with time and the better you take care of them the longer they will last.
The Surgeon
 Picking
a good surgeon of course is extremely important. We researched the
many surgeons in our area and went directly to therapists that rehab knee
replacement patients. If you have a good therapist contact they will also
know what local medical facilities will provide you with the best care.
Now whether you can coordinate this with the surgeon of your choice I am not
sure. Choosing the best facility may be the best thing to do first and
then choose a surgeon that is attached to the facility. Don't let travel
convenience trump going to the best facility.
Picking
a good surgeon of course is extremely important. We researched the
many surgeons in our area and went directly to therapists that rehab knee
replacement patients. If you have a good therapist contact they will also
know what local medical facilities will provide you with the best care.
Now whether you can coordinate this with the surgeon of your choice I am not
sure. Choosing the best facility may be the best thing to do first and
then choose a surgeon that is attached to the facility. Don't let travel
convenience trump going to the best facility.
Bi-Lateral Knee Replacement
 Bi-lateral
knee replacement surgery means that both knees are replaced. Patients who have
severe knee arthritis in both knees may be good candidates to undergo bi-lateral
total knee replacements. In general, there are two types of bi-lateral knee
replacement surgeries.
Bi-lateral
knee replacement surgery means that both knees are replaced. Patients who have
severe knee arthritis in both knees may be good candidates to undergo bi-lateral
total knee replacements. In general, there are two types of bi-lateral knee
replacement surgeries.
The above prosthesis I believe are the Stryker brand. They are one of or the leader in this field and we believe are much more durable than the devices used in the past.
Simultaneous Bi-lateral Replacement
A simultaneous procedure means that both knees are replaced at the same surgery,
in one day.
Staged Bi-lateral Knee Replacement
A staged procedure means that the knees are both replaced, but not on the same
day. The second surgery may be performed as early as several days after the
initial surgery, or several weeks or months later.
Who should consider bi-lateral knee replacement?
Patients who have severe knee
arthritis in both knees may be candidates for bi-lateral knee replacement
surgery. The same criteria used to determine if a single knee requires
replacement are used to determine if both should be done.
Are you ready for bi-lateral knee replacement?
What are the risks of a simultaneous bilateral knee replacement?
There are concerns about performing a simultaneous knee replacement because it
is a longer surgery and is more demanding on the body. Because of this patients
who have cardiovascular problems, pulmonary disease, or are over the age of 80
are often advised against a simultaneous knee replacement procedure.
Our Choice
My wife had 1 knee replaced 1-13-09 and the second replacement 4-14-10 and were much better prepared for the second replacement. For the first time in about 6 years my wife now can stand and walk on two legs without structural knee pain as in bone on bone. There still is soft tissue discomfort, but it is subsiding. Staples have been removed 5-1-10. Incision is closed and healing well and it appears like the other one the scar will be hardly noticeable. We daily take a small piece of Aloe Vera, take the prickers off of the sides, slice the piece in half and take the two half's and gently apply the aloe gel with a little down pressure, not much on the scar. Again this is after the incision is well healed and you have clearance from the nurse to do it. When you get done with the incision apply the rest of Aloe's magic over the entire area. If you don't have your own Aloe plants standing by (You should) ask around many neighbors have them in there back yards or in pots within their home.
Update 7-10-10
My wife has made a remarkable recovery in the second replacement. We attribute this to our experience in the first procedure, proper icing for one thing. (Detailed below) A very aggressive in home therapist at the start. The fact that she had a good leg from the first procedure made a huge difference. Having a recumbent bike (Detailed below) from the start of our second recovery that we purchased late in the first recovery period. The therapist had her on the bike a week after the procedure. Every knee replacement patient should have a recumbent bike as they will need it the rest of their lives, let alone the benefits derived in the recovery period. I say they will need it the rest of their lives because unattended knee replacements can be problematic in time, stiffness for one.
There is a bonus in keeping your knees in shape, it reflects on your entire being by enjoying physical activity that you would most likely not engage in if it wasn't for the knee implication.
Because of the factor above and the new knees my wife is a new woman and I can't tell you how delighted we are with her new life, because the last 4 years with those bad knees were a S.O.B.
Update 11-29-11
My wife is playing competitive tennis with her 2 new knees and is not experiencing any discomfort what so ever. Of course she was really a trooper doing her rehab on each knee and the more you read about knee replacements and the need for diligent rehab post op you will appreciate the out come and especially the consequences of slacking off on the rehab. If you meet someone that has experienced a bad result from replacement you can bet there is a good chance they didn't do enough rehab.
In addition to my wife's tennis (Doubles on clay) she is constantly on the run. It is amazing and we are really so proud of her.
Your GP

Not all GP's visit patients in the hospital. Check first and if there is a reluctance have your surgeon assign an in house Doc to your case. We had one and he was excellent. Don't expect that the attending physician on a floor is going to be covering every detail of your case.
My wife ran into a morphine overdose that was overlooked. We the family didn't know what the clinical signs or precautions for an over dose were, until after the fact and my delirious wife started to pull all of her tubes and intravenous needles out and told my daughter in the middle of the night that she was "getting the hell out of here and going home" Even with a controlled restriction on morphine there is the chance of overdosing.
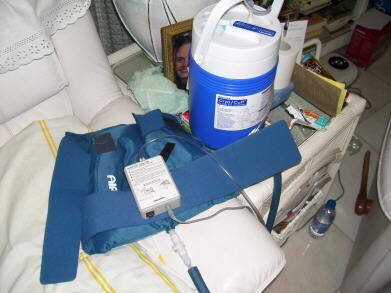
The Bucket, Water Cuff and Pump
 This
is the most important segment in this entire feature on Knee Replacement
Therapy.
This
is the most important segment in this entire feature on Knee Replacement
Therapy.
We receive over 40 thousand hits a year into our Blueeyedcurse website from all over the world that has close to 50 features and the Knee Replacement feature leads the pack in popularity hits. In many of the search conditions that are recorded in the Site Meter we use the most common search condition relates to the concern for scar tissue and the ability to effectively gain zero extension and close to 120 degree flexion as demonstrated earlier in this feature. These two issues are directly related to scar tissue and you can bet the farm that folks that have a problem with knee replacements (flexion and extension) after the operation are the patients that neglected adequate therapy during the entire process. A good percentage of knee replacements turn out sour because of neglect and those who neglect pay for it for the rest of their lives.
All surgeons that do this operation are conscious of the important aspects of this scar tissue issue and insist that the patient and family do what they need to do. In fact we even bring out the "Mean old Surgeon" previously in this feature that came in the day after my wife's replacement and deliberately pressed down hard on both sides of her knee to "demonstrate" the importance of dealing with what is an immediate body response to these very severe operations and that is SCAR TISSUE developing almost immediately.
Keep in mind someone who has gone through the complicated and extensive invasion necessary in replacement will have a natural tendency to keep the knee in a bent position to take the stretching pressure off of the area. It is just a natural reaction. Stretching these areas are imperative to eliminate the long term effects that a restricted area would provide.
To this day we believe the surgeon was not only demonstrating what the family had to do but was actually effecting a day after procedure to get the ball rolling. OOOCH!
RICE
We are all acquainted with the RICE theory of dealing with an injury or a surgical procedure that involves swelling. R for rest, I for ice, C for compression and E for elevation.
On the other hand swelling of the area is a natural occurrence, that has to be contained to allow for physical therapy to commence with minimum interference that swelling causes.
The devise and process below that we refer to as the "Bucket, Cuff and Pump" provides all 4 of these critical measures starting with the patient just hanging out for awhile in the rest mode, with the ice, compression and elevation as we assume all patients will have available a "Lazy Boy" type of a chair to accomplish the leg elevation along with perhaps a little propping up under the leg, like a soft pillow.
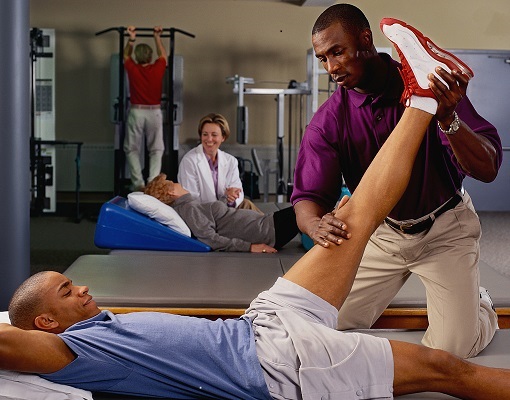
Physical therapy starts immediately that includes the day one CPM application that mechanically continues to move the leg. I believe this is installed in the operating room along with the ice process. The only problem with the CPM is that some surgeons believe that its continued use prevents the patient from doing the more aggressive therapy that is needed. When using the machine you will see that it does not give the patient the full extension and flexing to the extent that is needed. It probably has the ability to do so but it would have to be directed by an expert in the use of the machine, not a passive patient and family member. Our surgeon couldn't get us off the CPM machine soon enough and into some serious aggressive therapy. We suggest the CPM for a few days after the operation and even then alternate it with some serious stretching and bending under the direction of a therapist.
Entering your Room
Upon entering your hospital room after a short recovery room stay post op, you will find these 2 devices, the ice bucket etc. and CPM, besides the usual wires and IV tubes etc. The ice bucket is a wrap around affair pictured above that is put on in the recovery room. No one in the nursing staff we had knew how to operate it on the first knee procedure and a minimal amount of expertise was displayed a year later on the second knee. Now what a patient will find in other hospital facilities regarding the quality of care and knowledge of the general staff we do not know and in fact we would welcome any input from those who have experienced this affair.
We didn't recall what the state of the bucket and cuff was when it was applied after the first knee, but on the second knee a year later we observed the level of water in the bucket immediately post-op and the level was considerably more than what was required for the process to function properly, by the marking on the inside of the bucket. This level is critical in how well the process works and if the bucket is full of water and ice you are whistling in the wind.
Don't take this lightly, it is extremely critical in how fast the patient recovers and what condition their leg and overall health will be for the rest of the patients life.
Keep this in mind that when you ice properly it keeps the swelling under control. When you keep the swelling under control you are able to do the necessary therapy, the bending and flexing, where excessive swelling interferes with this process. Sure continued flexing and bending prompts swelling, but icing periodically like 6 to 8 times a day or more in between therapy sessions whether they are self or professionally administered is the process.
The problem with the process is that it lasts for a week or so, the time involved in doing the icing and preparation is a all day affair and would require multiple parties to chip in. If you rely on one party like a spouse to take care of this icing and all the household duties this could be a mistake. Have a relative or good neighbor come in a few times a day and help with the below icing process.
In fact we the family tried in the hospital to provide our best efforts in this ice bucket brigade, but it turned out to be a fiasco. After 2 days of fumbling with this device the night we were released after the first knee replacement, the attending Doctor came in, told us we were entitled to take the unit home with us and asked where the pump was for the ice machine (It is the little box on top of the blue wrap in the picture above). We did not know about a pump and it appears neither did the nursing staff. The Doctor looked under the bed and there was the detached pump. 2 critical days lost with out adequate icing, other than what we were heaving in it from the ice machine that turned out to be totally inadequate, meaning it just didn't do the job and I believe really set my wife back. Keep in mind that COMPRESSION is one of the most important parts of this process and keeps the swelling down with the ice so that the therapy being performed will be more effective. You will not gain adequate compression if you do not follow the procedures listed in this feature.
In fact to give you an idea how important the icing operation is, we asked the evaluating therapist the first full day we were home "How many times a day should we ice?" He said "Every hour for 15 minutes" I said to myself "He must be kidding". Of course as the days go by and the swelling subsides you can lengthen the time between icings, but always after therapy.
We asked him whether we could use bags of frozen peas and ice packs, that would be easier than the bucket and the water cuff. He said nothing compares to the effectiveness of the bucket, cuff and compression pump as it wraps around the entire area snuggly as the entire area has been breached.
Now this bucket, pump and cuff is a sophisticated device. When they give you the machine to take home, the instructions that came with a new machine most likely have already gone in the hospital dumpster when unwrapped most likely in the operating room. There are some instructions imprinted on the bucket but incomplete. The siphoning action requires a precise water level along with the ice that is put in it. We learned after taking it home, that the water level of course would rise with continued ice addition. You could get along the first few day by just adding ice by taking a cup and bringing the water level down to its desired level, marked on the inside of the bucket.
Our preference in this operation for this device to work properly before use is to bring the bucket and attached cuff to the sink and dumping the excess water from the melted ice. There is the plastic tube that is easily detached from the top of the pump so that you can bring just the bucket and cuff into the kitchen for water leveling and ice addition. The pump and electrical connection stays in place and the detachment of the bucket and cuff is simple.
After each icing session the bag should be emptied into the bucket by opening the vent and elevating it over the bucket. A half hour or so before the next icing session keeping the bag over the bucket, (So that water does not migrate back into the bag, dump out excess water to the required level, and adding an adequate amount of ice (About 15 to 20 cubes) into the container followed with the water to the precise level mark. This is a little bit of a sloppy operation and why we prefer doing it at the sink.
Now when the device is brought to the lying down patient we keep the bucket below the bag (Just place it on the floor) to eliminate water migrating back into the cuff and until we wrap the knee with the empty bag. (This is important) Please don't wrap the knee and surrounds with a bag that has water in it. This is probably one of the biggest mistakes that are made with this critical process as it upsets the compression principles of the device. The cuff should not have any water in it anyway, because if water was left in the cuff between icings, it would warm up from being at room temperature. Drain the water completely back into the bucket after every icing. It is important that 20 minutes before the bucket and cuff is brought back to the patient that ice is placed in the bucket and the water level is brought up to the proper level. In addition 20 minutes will give the water a longer time to get very cold and this is what you want.
After the leg is wrapped you are instructed at that point to open the vent and raise the bucket over the bag. It doesn't take long for the water to migrate around the cuff. After the cuff is full, (20 seconds at the most) close the vent and place the bucket about 15 inches above the cuff. The bottom of the bucket just about level (or a little more) with the knee is optimum. This is important for the siphoning and pump to work to peak efficiency. You then turn the pump on. In a short time you will hear the pressurized activity. About 20 minutes of icing is enough, don't over do it. More icing at shorter intervals is much better than long icing periods. Give that area a chance to work with the fluctuation of warm and cold. This is the principle of contrast bathing, warm, cold, warm, cold.
As soon as the icing is finished a new cycle begins for the next icing period, so it important that you raise the bag over the bucket, open the vent, purge all the water back into the bucket. This will give you a good cold start for the next cycle that goes right back to bringing the whole deal into the kitchen with the empty cuff and pouring out the excess water to the line inside the bucket after you have added the ice. You don't want to put the ice in after you put the water in the bucket.
We did have one nurse on the regular hospital staff that was some what acquainted with the fact that some water had to be removed to maintain a desirable level in the bucket. Twice in 2 days she came in and removed some water from the bucket with a cup and dumped it into the sink. She didn't bother to add any ice, but obviously someone had instructed her to try to maintain that critical level. The 6 or 7 other nurses we were exposed to didn't know about this level, and just relied on us the family maintaining the ice and water level. If we didn't take care of this icing we wouldn't have received any degree of icing. A patient that endures this rather major operation hopefully by a first rate surgeon as we had certainly deserves the best after care and proper icing is on the very top of the list.
It is important not to over ice. Most therapists will recommend at least at the start every hour to do 15 minutes of icing.
I know this has been repetitive but it is so important that you understand this process. If you don't understand it find someone that will read these instructions and follow them to a tee. If I had to do all over again I would have sought out a rep from the bucket and cuff company and insisted on a dry run. They would have no choice but to accommodate you.
If you are having a problem with this bucket application any time night or day from anywhere in the world call me 954-922-9181. Even if you are in the hospital room sitting alongside the patient and somewhat confused call me and I will walk you through the process. The stakes are very high and proper icing is critical.
CPM Machine
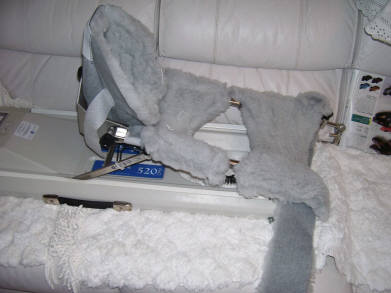 The
next device is what they refer to as the CPM machine standing for
"Continuous Passive Motion" This device almost
immediately is applied post op, for a number of reasons, blood clot
prevention for one. The hospital staff is required to put the patient
on this machine quite often during the day and for long periods. It
very slowly bends the knee and
The
next device is what they refer to as the CPM machine standing for
"Continuous Passive Motion" This device almost
immediately is applied post op, for a number of reasons, blood clot
prevention for one. The hospital staff is required to put the patient
on this machine quite often during the day and for long periods. It
very slowly bends the knee and
 returns
your entire leg to a fairly straight position. Don't expect the
nursing staff to come frantically running in to put this machine on.
It will be up to the family members to see to it that this machine is used
to the Doctors specification. Just call the nurse in and tell her/him
the machine should be on the patient and help them.
returns
your entire leg to a fairly straight position. Don't expect the
nursing staff to come frantically running in to put this machine on.
It will be up to the family members to see to it that this machine is used
to the Doctors specification. Just call the nurse in and tell her/him
the machine should be on the patient and help them.
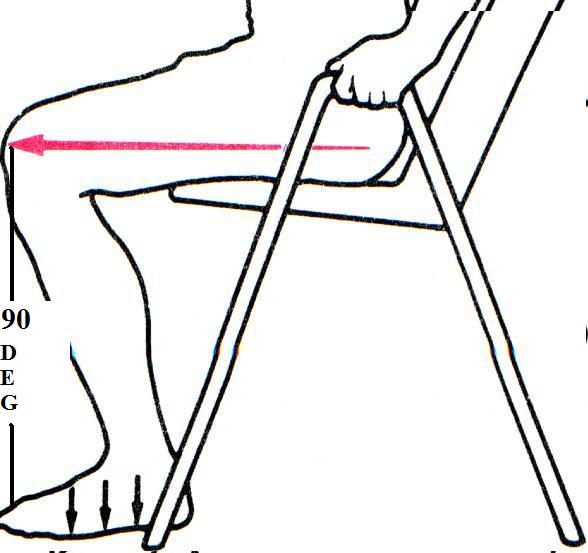
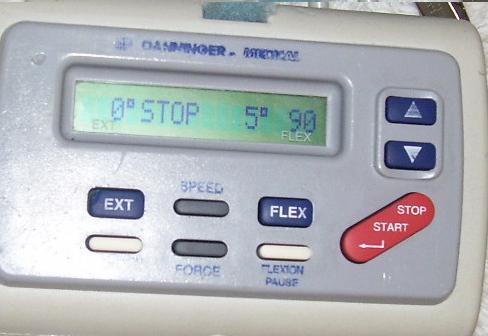
There is a control demonstrated on the right that allows
adjustment of the two critical positions, the "EXT" Extension or the leg
straightened out to some degree. You will notice the current setting
is 0 degrees. This would have the leg in a straight horizontal position
that is really distorted to a large degree by the fact that your rump is on
the bed or couch and this soft surface does have a bearing on how accurate
the setting is. The setting on the right the "FLEX"
Flexion determines how much
of a bend you apply to the knee. We are told that the
 therapists shoot for something in the neighborhood of 110 to a 120 degrees
flex and 0 degrees extension, but again you cannot rely on the settings of a
CPM to give you an accurate reading. A Doctor or knowledgeable
assistant has an angular measuring device that tells you the true reading.
It is a good device, but our advice is to try and find someone in the
hospital immediately after surgery when they put you in it that knows what
settings should be used, when they should change, because no one said
anything and we were again like the deer in the headlights. My
guess is initially they should start you on about 80 degrees flex and
10 degrees extension and see how soon you should progress with some guidance
from a professional. We are not sure about this, so get some advice.
therapists shoot for something in the neighborhood of 110 to a 120 degrees
flex and 0 degrees extension, but again you cannot rely on the settings of a
CPM to give you an accurate reading. A Doctor or knowledgeable
assistant has an angular measuring device that tells you the true reading.
It is a good device, but our advice is to try and find someone in the
hospital immediately after surgery when they put you in it that knows what
settings should be used, when they should change, because no one said
anything and we were again like the deer in the headlights. My
guess is initially they should start you on about 80 degrees flex and
10 degrees extension and see how soon you should progress with some guidance
from a professional. We are not sure about this, so get some advice.
Our surgeon although giving us a script for a CPM to be used at home for the first knee has since soured on using these machines just a few days after their use in the hospital. He claims that patients take up valuable time with this "passive" device and do not do the necessary strengthening of the muscles the quads in particular naturally. We agree with this thinking although the best scenario would be to have a machine available for a few days or so at home and use it for a warm up, preceding therapy sessions. I tried to sell this to the surgeon but he wouldn't buy it, because he believes that the patient would rely on the machine too much and actually substitute it for doing the real beneficial therapy. If you are given a script for a CPM for your home, don't be caught in the trap. Use it for a few days and have the company pick it up.
The Great Escape
 The
Great Escape that wasn't so great. I am referring to the night, that's right the
night we were released from the hospital after the surgeon wrote us scripts for
medications and equipment that we needed to navigate with. A Doctor writes
a script at 6 o'clock at night in a hospital and by the time the nurses get
around to you it is like 8 P.M. and if you have a problem like we had without a
walker to go home with, by the time you reach the Doctor on the phone it is like
9 P.M. In fact being that we did not have a walker and were faced with
dragging my wife through the door of the house to the toilet and to bed, we
finally through an act of congress got the hospital staff agreeable to loan us a
walker until the next day when one was to be delivered to our home. It was
like pulling teeth and only after the Doctor over the phone gave them holy hell.
MAKE DAM SURE YOU HAVE A WALKER TO LEAVE THE HOSPITAL WITH AND DON'T WAIT TILL
THE LAST MINUTE TO DO IT! On release they take you to your car from your
hospital room , dump you in the seat, and if you get home with out
a walker it is like being up a creek with out a paddle.
The
Great Escape that wasn't so great. I am referring to the night, that's right the
night we were released from the hospital after the surgeon wrote us scripts for
medications and equipment that we needed to navigate with. A Doctor writes
a script at 6 o'clock at night in a hospital and by the time the nurses get
around to you it is like 8 P.M. and if you have a problem like we had without a
walker to go home with, by the time you reach the Doctor on the phone it is like
9 P.M. In fact being that we did not have a walker and were faced with
dragging my wife through the door of the house to the toilet and to bed, we
finally through an act of congress got the hospital staff agreeable to loan us a
walker until the next day when one was to be delivered to our home. It was
like pulling teeth and only after the Doctor over the phone gave them holy hell.
MAKE DAM SURE YOU HAVE A WALKER TO LEAVE THE HOSPITAL WITH AND DON'T WAIT TILL
THE LAST MINUTE TO DO IT! On release they take you to your car from your
hospital room , dump you in the seat, and if you get home with out
a walker it is like being up a creek with out a paddle.
In addition we were released without pain meds,
but had the script from the surgeon and had to wait in the parking lot of the
Pharmacy until after 10 P.M. We didn't have an adequate portable potty
until the next day
and
with an aggravated hernia pulling my wife off of the toilet.
Needless to say all of this should have been arranged a day or two before
release, I am talking equipment delivered to the house, medications in hand and
for crying out loud a daytime release. Don't be like we were a "Deer in
the headlights." If they want to release you late at night 2 to 3 days
after a major operation even if you are somewhat prepared, tell them to go to hell.
The all important Potty.
When you gotta go, you gotta go!
The two potty version below is a convertible affair. Some of you are acquainted with them, some like us were not. In fact we talked with a woman today that had a cracked pelvis, went on unnoticed for 2 months until they took MRI's, but no one ever recommended a potty as she was in sheer agony going to the bathroom. In fact the same day that the below convertible potty was delivered by a Medicare supplier we foolishly went out and purchased the version where you take the existing toilet seat off and bolt an extension in its place as the patient needs extra height. The problem with the one that we bought it did not have the handles that the below illustration shows. In some cases the potty without the handle is a good approach if you have a bath tub or something solid to push off on to rise off the potty because these potty's are higher than the portables.
 The
convertible aspects of the potty has an open sleeve that
fits on top of the existing toilet seat. You can do without the
sleeve shown to the right as it is troublesome detaching. Without the
sleeve there still is a clear opening to the toilet and makes it faster to
put on the closed pot in an emergency where the patient cannot make it to
the John. The second option is the closed pot (On
top left) that you can use near the bed if the patient does not have good
mobility at the start.
The
convertible aspects of the potty has an open sleeve that
fits on top of the existing toilet seat. You can do without the
sleeve shown to the right as it is troublesome detaching. Without the
sleeve there still is a clear opening to the toilet and makes it faster to
put on the closed pot in an emergency where the patient cannot make it to
the John. The second option is the closed pot (On
top left) that you can use near the bed if the patient does not have good
mobility at the start.
I mentioned above in the feature that we relied on the walker at night when the patient slid down off of the bed and grabbed a hold of the walker. You need the walker for awhile just to turn 90 degrees and your night manager places the potty under you. This is where the handles on the potty really come in to play so that you can then boost yourself up to the walker handles, then make your turn and up into the bed.
The best scenario would be to have two of the convertible potties, even if you had to purchase one. You can use the one in the master bath, and move it closer to the bed for night time use by easily switching to the closed pot. The second potty could be used in a second bathroom in a closer location during the day , and use it in an emergency in just about any place in the house. It can be positioned opened over the bowl, but have the closed pot real handy.
Now there comes a time when the raised potty is actually a hindrance to healing. At first when you are really hurting it is a God send. We stayed with the raised potties until one day the rehab folks put her through exercises that really simulated getting off and on a regular bathroom potty seat. In fact they insisted that there were no hands used, after awhile that is. The height of the benches were just about normal potty height. I told my wife forget about the raised portable potties. In fact doing about 5 up and downs from the potty at the normal toilet seat height as long as it didn't hurt her "much" would be good exercise and she did that.
WARNING Raised Potties can be a serious health hazard.
Now this may not be on the surface a very important issue in this affair, but it happens to be critical and involves your bathroom habits. Our head therapist warned us that we were lingering too long with the raised seat and that we could be hampering proper urinary and bowel eliminations.
There are health advocates that actually believe that the height of a standard John is not conducive to the proper elimination of wastes. Now to support this, observe any animal going through a bowel movement. Notice the degree of bend. Of course the animal does have the luxury of "doing it" anywhere they like and most of the time on the turf. If you compare the animals angle to one sitting on a standard John let alone a raised affair you can easily come to the conclusion that this has to be addressed. Addressing it means at the least getting back to the normal height with a standard seat A.S.A.P.
 The
"In Home" Therapist
The
"In Home" Therapist
You will be assigned a therapist that will visit your home for 2 to 3 weeks. I would insist on at least 5 days a week as they will try (they being the medical and insurance establishment) to limit you to 3 days a week. Fight like hell for 5 days, you will get it and it will be worth it. You will be started on Out patient therapy as soon as you are done with In Home. They gave us a tentative schedule of 3 days a week for 4 weeks. With the progress my wife has made and the experience and especially the recumbent bike we have now in the house, we believe 3 days a week will do the job.
In our first knee experience we had a therapist that was good but we believe over cautious with the needed aggressive therapy. In our second knee we asked the home service company to provide us with another therapist and voiced our disappointment with the first one we had with knee 1. The service found us an excellent therapist and the difference in results was like night and day. For anyone in South Florida that would like to know the service and therapist we used our contact information is at the bottom of this feature. We will be more than glad to help you in anyway we can.
Range of Motion
Home care therapy starts immediately after an initial evaluation. Home care therapy as stated can last anywhere from 2 to 3 weeks depending on the progress of the patient, before you are assigned to a professional rehab facility. They have the works. Home therapy is limited, but again it all depends on the caliber of the therapist and the competence level of family home care after the therapist leaves. We believe that we could do as well or better if we had our entire rehab done by the in house therapist we had with the second knee.
Rehab at a professional facility can last for about 4 weeks (3 times a week) although rehab facilities are under a lot of pressure to move patients out that want to become glued sort of like a security blanket. There comes a time where you can achieve as much at home as you can at a rehab facility. The problem is the therapists are so nice, you hate to part with them as they have taken you through some very difficult times. After our second knee experience, I told the therapist "We have just plumb run out of knees".
REHAB Ultimatum
 We
were given in the first knee experience an ultimatum, that if we
didn't do better with our therapy flex and extension that we would have to
under anesthesia have a very aggressive manipulation to break the scar
tissue that had been built up by not doing the necessary therapy. We believe
this is a necessary
mind game the surgeon plays with a "lazy" patient as we stated we decided to opt out
of the manipulation and the threat really motivated us. Although we know of patients that have gone
through this manipulation and it isn't pretty. When they came out of
it they were really laid up and it is questionable regarding the value of
it, versus the consequences. My advice, do the therapy. Grit
your teeth and do the therapy. The manipulation and after effects are
a lot worse than doing your homework at least in our opinion.
We
were given in the first knee experience an ultimatum, that if we
didn't do better with our therapy flex and extension that we would have to
under anesthesia have a very aggressive manipulation to break the scar
tissue that had been built up by not doing the necessary therapy. We believe
this is a necessary
mind game the surgeon plays with a "lazy" patient as we stated we decided to opt out
of the manipulation and the threat really motivated us. Although we know of patients that have gone
through this manipulation and it isn't pretty. When they came out of
it they were really laid up and it is questionable regarding the value of
it, versus the consequences. My advice, do the therapy. Grit
your teeth and do the therapy. The manipulation and after effects are
a lot worse than doing your homework at least in our opinion.
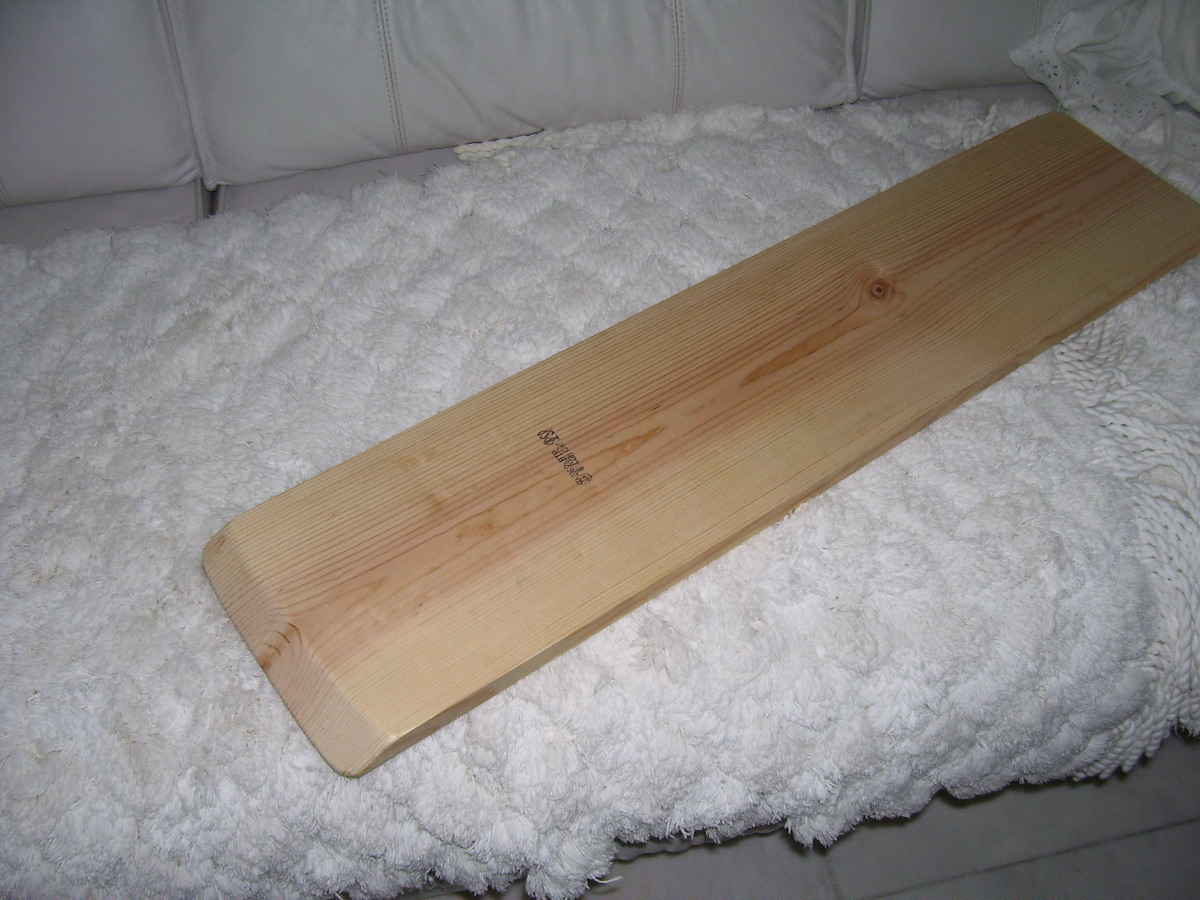
If you want to go the economy route, we have gone to the extent in trying to stiffen up conditions with a 1" by 6", 3/4" thick board about 3 foot long that fits under the edge of the rump (Notice the 45 degree angle that we cut on one end, the end that goes under the rump for comfort sake) and under the leg and allows the patient to do a fairly good job in extending the knee downward (The downward flex set exercise) as patients who have been dealing with problem knees before replacement seem to acquire a bent over posture, that includes a bending of the knees that do not straighten out in the walking process. The replacement is suppose to correct it, but therapy is needed big time to do it. The first thing out of the box from the surgeon and therapist is to get that knee flat as possible in what they refer to as 0 degrees extension. My wife at this point 6 weeks post surgery is about 2 to 4 degrees extension without assistance doing downward quad sets on a firm surface, as in a firm rehab table or board. At 12 weeks she is pretty close to zero, if not zero and the rehab folks are satisfied and in fact 3 months post surgery she is somewhere between 105 to 110 degrees flexion with out much cranking from the therapist. The board works nice for flexing as well, with a little booty sock you can slide back nicely for flexing. This is covered in more detail below.
On our last day at the hospital we took a walk through the hall way and in a little room leaning against the wall was a replica of what we had made with the 1" by 6" board including what I will call the bevel for the rump. It said for PT only.
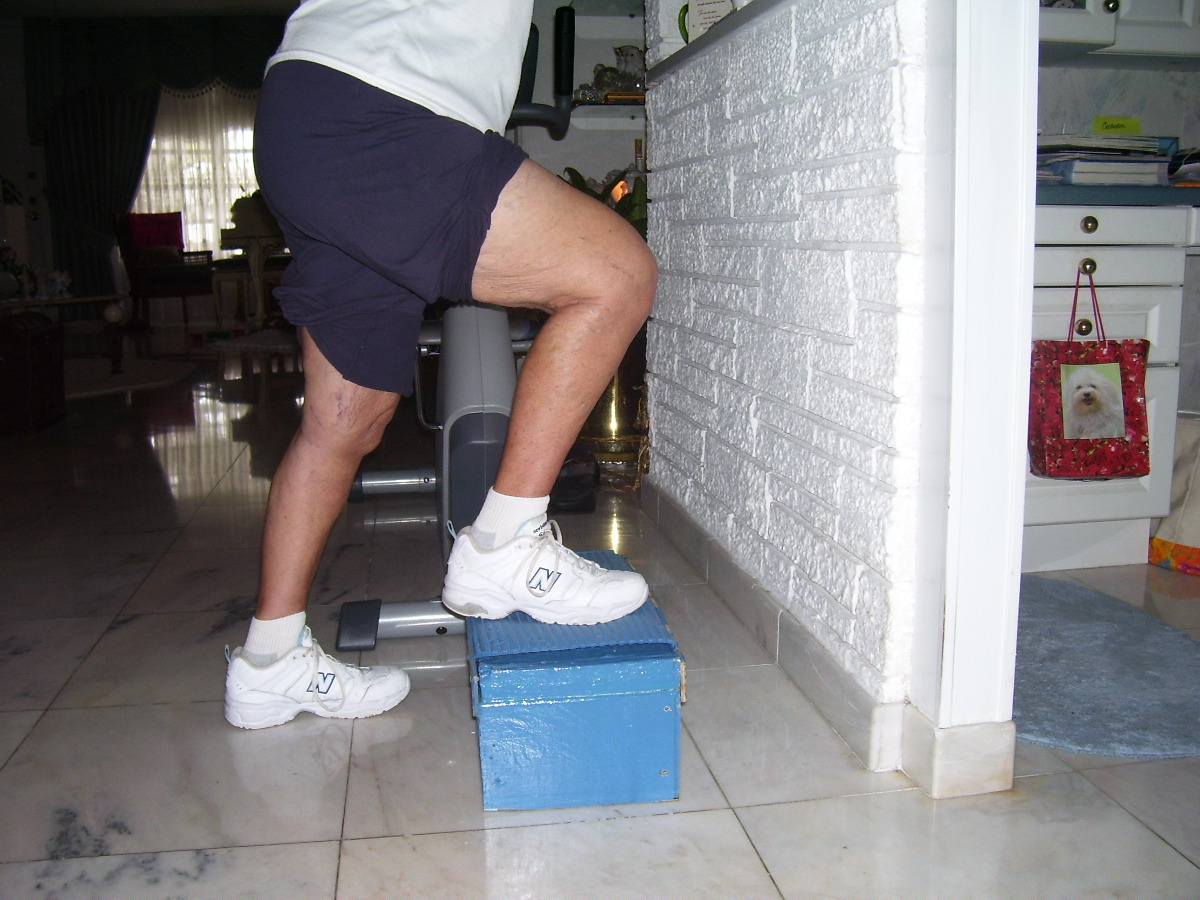
The Step
We discovered another great means to bend the knees, using a step. We constructed one that we use in the house. (Pictured below) Remember there comes a time where professional rehab runs out (insurance wise) and you are expected to continue rehab at home. We have been told that knee replacements as good as they are require regular exercise for the rest of your life. If you think you are going to finish professional rehab, and you will be good to go for the rest of your life without exercising diligence you are dreaming. Knee/hip etc. replacements are imposing a foreign object within, that the body has to deal with. It is like a stranger in the house "Who is this guy" Most knee replacements work fine and most cannot tell there is any difference before and after other than the replacement feels a hell of lot better pain wise, but again if you are at the age for replacements and old arthritis is hanging around, you need to keep that body moving with or without replacements.
Regardless of what your issue is whether it is knee replacement or an injury, or just plain precautionary measures, we believe a stepping regimen that you can also actually take to the streets in your walking regimen will be beneficial and of course clear this with a professional therapist to stay on the safe side.
If you experience discomfort when you step up this is where we believe step therapy may come into play. Stepping up produces a dynamics that nothing else does.
In my case as well as my wife's experience with her knee replacements we started step therapy in our laundry room going out into the garage. It is a shallow step about 4 1/2 inches high and perfect to get started with before you tackle the full step as detailed below. This full step could be a little high for some at the start hence our layer step method below.
The Layer step method
When you go to a lumber yard just ask one of the service people in the sawing area to grab you a good straight 2" by 8" 8 foot long piece and cut these pieces to your specifications. Home Depot in particular is very accommodating. Just throw the pieces in your shopping basket and have the attendant give you a ticket for the checkout for the whole piece.
You may want to just start with 2 layers stacked on the bottom of one another for a total of 3" using dimensional lumber as detailed below. Work on that 3 inches for a few days. Just step back and forth with it on the raised area. Apply all of your bodies weight on the involved leg. You may not need to hold and pull on anything with the 3 inch stack. If there is a little discomfort don't be in a hurry to graduate the height of the unit.
After you have mastered the 3" height you can then graduate it to 4 1/2 inches with a third layer. Always screw them into the bottom of the unit with screws that are no longer than 2 1/2" long so that you can easily disassemble them to a new height for a new need and especially if you tack a skid proof mat to the top of the unit.) Of course screws that are too long would not work very well.
If you really want to do these assembled steps right you can use a simple dole method that will keep the unit together when you are using it and be able to alternate different thicknesses with a simple dole method. Any handy man with a little craftsmanship can do this.
Wallmart's have these black skid proof mats that are inexpensive. You can cut a piece for the top member and tack it down with small screws or liquid nail it and you will have enough to place under the unit so it doesn't move. You don't have to screw or glue that on.
You may want to pick up a metal handle to screw into the end of the unit for easy pick up. They are in the hardware section.
Just lay the step on the floor when you need to add to the unit, flip the unit over on its top and graduate the thickness when you are comfortable from 3" to 4 1/2", to 6"height and last a normal step of about 7 1/2 inches height.
If you buy a piece of dimensional lumber long enough you could complete an eventual finished step of 7 1/2 inches. That would be 6 - 1 and 1/2" inch pieces and if you buy a 2" by 8" (actual measurement about 1 1/2" by 7 1/2") an 8 foot long piece will give you 6- 16" lengths or 6 layers. Just stack the pieces to the thickness that you can tolerate for the time being. There are all kinds of configurations you can apply with 6 of these layers. Just a very simple start is putting one layer in the front and doubling up two layers ahead of it.
In the case of our laundry room the aluminum door casing served as something to hold on to and initially serves as a pulling assist, because you may need that at the start.
Remember it is the traction and tension that does the job and once you get on a step of your own or at the rehab facility, try hanging the uninvolved leg in the air, and bearing the full weight of your body on the problem leg. You will quickly experience the dynamics attached to this operation. Between compressing the area with the hanging operation and proper stretching this should result in healing and don't be afraid to take a day off every so often if soreness develops. Pick up a bag of this solution that you can put in the refrigerator. These bags are the same that are used in ice coolers.
Now you do need something to hold on to and it has to be fixed and solid. Just as you step up you again are holding on to something secure and rock back and forth similar to the wheel chair method. You will find that you can achieve a rather nice bend. Go easy at the start. Your muscles will need some sensible conditioning for awhile. Take some advice from your therapist on this step affair.
Keep in mind that the below photos and applications were specifically designed to accommodate a rehabbing knee replacement patient although the applications can be used for different problems regarding the legs from hip to toe as most of the applications are designed to build up the soft tissue areas that have weakened for one reason or another.
#1 Photo
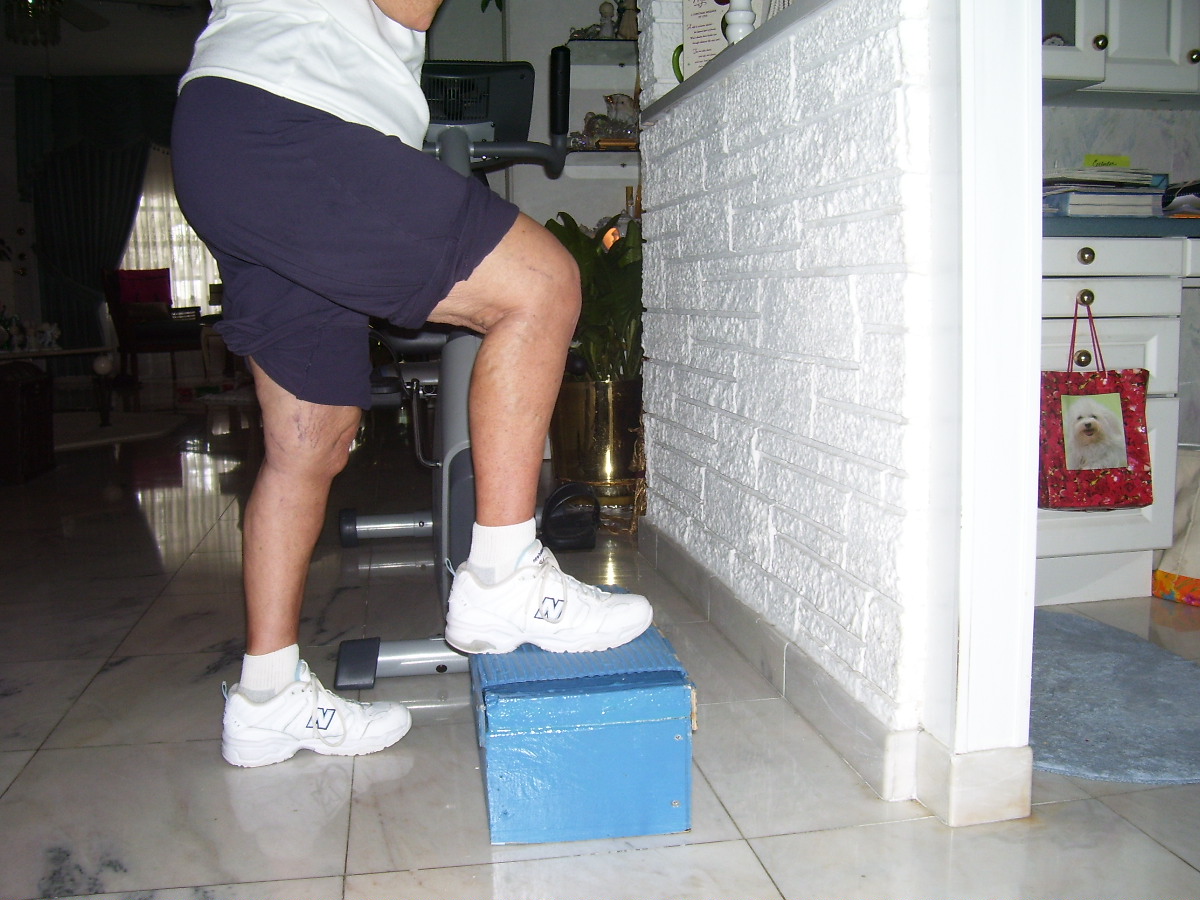
The number 1 photo is showing the subject stepping up on the step, but leaving the uninvolved leg planted on the floor. In this position tension can be applied to the knee and leg by a simple rocking motion. Again the uninvolved leg remains on the floor. Using stairs by bending and lifting the knee will be more difficult depending on the stage of the replacement or injury you are at. Walking and lifting is much easier than doing a stair lift with the involved leg. In this knee replacement feature we stress the need to have an area that you can grab on to and pull on when you are starting a stair lift. When starting a stair lift just a rocking motion with the uninvolved leg firmly planted on the ground level may be all that can be accomplished for awhile. In time the goal is to place the involved leg on the stair, and lift the uninvolved leg up using the involved legs tension with a bend and thrust to the stair level. Once you reach this goal than the next step is to continue up a flight of stairs even if you have to use a pull assist as in a banister application.
#2 Photo
The # 2 photo shows the subject applying tension on the step and doing the rocking procedure, that serves the purpose in stretching the soft tissue areas compromised with the surgery or healing an injury. This loosening up will prepare for the next action. In this mode still leaving the uninvolved foot on the floor to facilitate the rocking motion and for that matter the same position to do the flexions. You can suspend your uninvolved leg in the air by stepping up on the stair with your uninvolved leg and really put some tension on the involved leg by hanging the uninvolved leg over the side of the step. I wouldn't do any serious flexing without supervision, as the tension is greatly increased in this mode. You must be very careful early in your rehab as to bending with tension. Seek advice and go easy.
If you take particular notice in the photo above I think you will see that in the rocking action the flexion angle goes past the 90 degree mark and my guess is that the above demonstration hovers at 110 degrees or more.
#3 Photo
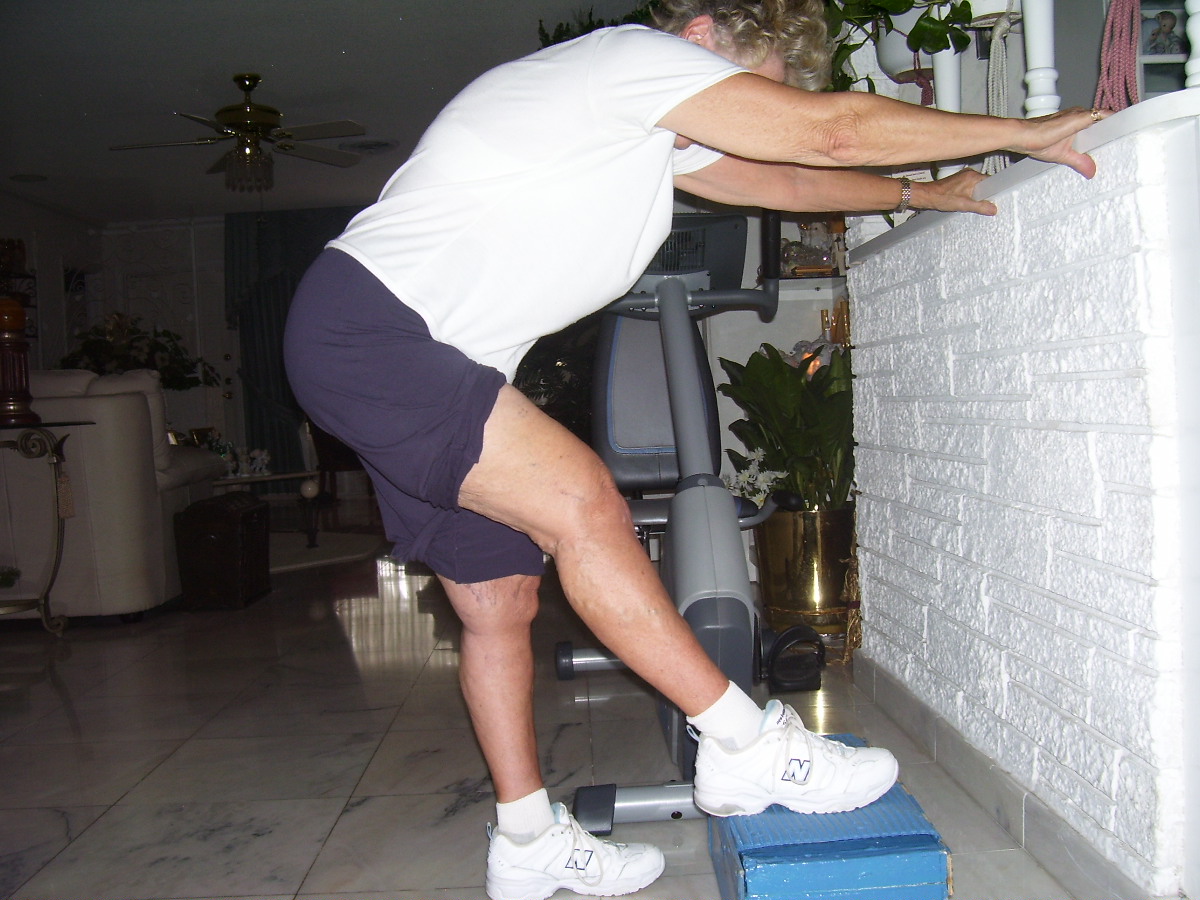
The # 3 photo shows an extension mode. You will note the short wall that we are using for leverage. Actually in this mode you are really pushing on the wall, not pulling. It is important that you find some area in your house to be able to hold on to and it has to be secure. Again doing these extensions measure up to close to what you can achieve with the 1" by 6" inch board on the couch, the quad set, but it is a different dynamics and we feel it is very beneficial.
#4 Photo
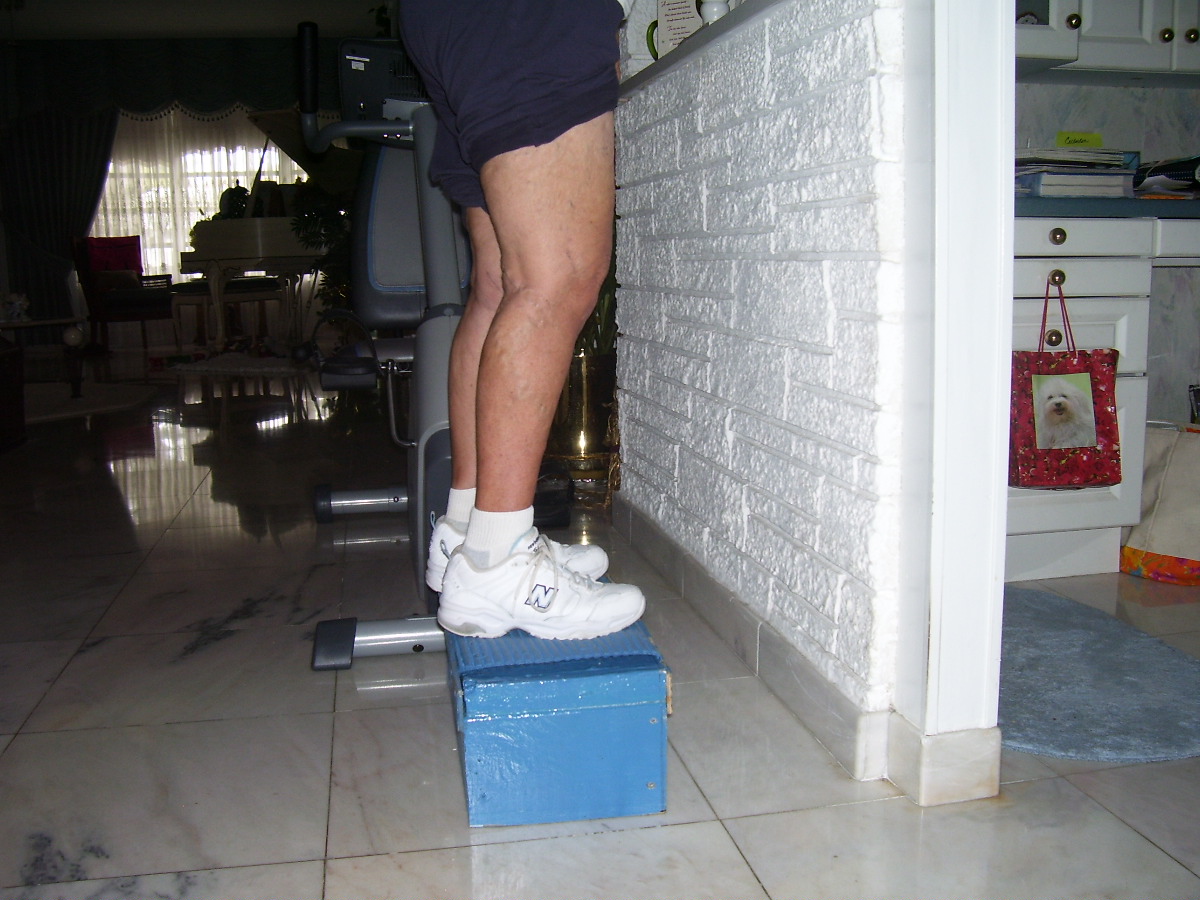
The # 4 photo shows the subject standing with both legs on the step.
In order to reach the top of the step you have to do a step maneuver and this can be tough and uncomfortable. Remember in order to do this step properly you cannot cheat and hyperextend your leg to lift your body. You need to bend your knee forward and use your entire leg including your quadriceps and calves to properly lift yourself as hyper extending will accomplish the same thing but you can't function with a stiff leg. Bending and applying pressure to all of the leg components is what you need to do to protect the integrity of your entire being and in particular your hips. This applies to any of thick ness's you are working with. Again you may have to go back to much less thickness before you tackle the above step on a full 7 1/2 inch thickness step. If you can't accomplish a lift without bending your knee and a thrust even with a pull assist, then it is time to go back to the less thickness modes, like our 4 1/2 inch laundry room application with an areas to grab and pull assist and this again may be in just a rocking motion.
They are calling in hip replacements by the thousand right now because of the malfunctioning of the designed parts of a prosthesis and I suspect it is the patient themselves through lack of the proper continuous rehab that has caused and will cause hip problems before and after replacement. Yes continuous maintenance exercises will be important almost on a daily basis for the rest of your life and I would say for those getting along in years maintaining your legs whether you have replacements or not will be critical and will have a huge bearing in the quality and length of your life.
Incidentally any replacement and especially the need for dental work requires the use of powerful antibiotics to be used before the work starts. The mouth and especially the bacteria in the mouth can have serious consequences and in particular if your gums are somewhat diseased. Diseased gums open a gateway to the blood network and bacteria and infection seems to be a serious problem in replacement areas of the body, hips and knees for example. In our research we have discovered that infections in these areas where prosthesis's have been installed are very difficult to deal with. This is why it is critical to keep a handle on your teeth and gums and especially if you have had replacements. I personally see a good dental technician every 4 months and I don't have replacements. Let me tell you the gal that does me takes no prisoners and I welcome her aggressiveness and in fact I encourage it.
These stepping exercises can be used for strengthening the muscles etc. by stepping up and down without much bending although in time you may want to be creative with again some guidance from the pros. In this mode it would be smart to hold on to something when you step up, but in time stepping up without something to hang on is the goal as there are many cases where you are required to use steps that do not have hand rails to use.
This mode would be a good opportunity to do some balancing on one leg. Just pick up one leg and with a little security of the wall to hang on to, try to release your hands entirely for a short period. The balancing will be critical to getting you started on a proper walking regimen.
I had an accident 1 year ago with my left leg and although I have gone to at least 7 medical professionals for direction I am sorry to say that because of the nature of the accident and symptoms and the masking of our other issues where we did not concentrate on what I believe should have been a priority.
This was to concentrate on solving my accident implications before trying to resolve some of my other problems. We know now that one approach can conflict with another unless you have a real good pro PT you are working with.
This is where a good physical therapist comes into the picture and you may have to pay for this service as insurance is limited and will become more limited as time goes on. When I say limited this could very well apply to the quality of care and in particular the accuracy of the diagnoses. You can be injured when medical people "experiment" with your case.
So now after a year of seeing medical people that really had no clue because of the complexity and my multiple issues that are not uncommon with the elderly and at 77 years at this writing I have to consider myself elderly. I have decided to take matters into my own hands and incorporate the steps as illustrated above for my own issues. I have been hoping that what I have been doing for the last year would solve my problems and although I can navigate very well without discomfort, walking up steps is a problem and my intentions are to fight fire with fire and doing stepping exercises hopefully will do the trick.
My problem is to get in the habit of taking a rest for a day or two between workouts to promote healing. When you encounter soreness in an area that you have been working this is an indication of the need to rest the area and about the only activity I would recommend is light stretching and a relatively short walk, and doing the walk as recommended in our walking segment below, that simulates to some degree the stair exercises as walking and the stair exercises work similar parts of the areas south of your hips but also includes your hips.
My wife had different issues with her knee rehab in the home but yet the same principles she used I believe will aid my problem. She had a great deal of difficulty with steps. Building up soft tissue around the knee and all skeletal parts from the hip to the toes is the key to success.
If you scroll back to photos #1 and # 2 you will see where my wife is bending her knee in the process of doing the step. Her process eventually resulted in her putting enough weight on the involved leg to accomplish minimum amount of discomfort. The bending is important because I was instructed this very morning when attempting a step maneuver at a physical therapist session, that I was "Cheating" by actually hyper extending my leg and knee to distribute the pressure in a way that was not causing as much discomfort as the natural approach to navigating a stair/stairway. You must be able to naturally bend your knee, apply pressure on the toe area initially and complete the step with a bending of the knee and a lift incorporating your quads and calves etc. and not again as mentioned above by hyper extending (stiff legging) the leg to accomplish the lift. Incidentally when you walk you can do something very similar by bending your leg backward and coming forth with lifting action as this will simulate to some degree a stair stepping action.
Walking and stair stepping as mentioned above are very similar in their movements and walking in particular especially if you discipline yourself can be very beneficial in correcting the problems associated with stair climbing. There are obviously parts of the legs in the walking process that are also part of the lifting and tension aspects of stair climbing. Walking where you incorporate your calves, quads, rolling of your feet, along with lifting and applying weight on your involved leg etc. and all the rest will compliment your stair climbing goals.
 When
you walk even in the house get in the habit of a little heel to toe motion.
A therapist showed us a shoulder rocking motion as you walk and this worked
great as it translated into a very nice erect walk, something my we have not
practiced for many years.
When
you walk even in the house get in the habit of a little heel to toe motion.
A therapist showed us a shoulder rocking motion as you walk and this worked
great as it translated into a very nice erect walk, something my we have not
practiced for many years.
A treadmill can also create the counter balance we referred to in the first part of this feature as well, for those who are suffering from muscle imbalance from repetitive activities and the complications from it. One important practice you can bring into the mix is bending your knees back while walking on the treadmill. When knees start to give you problems the first thing that happens is you start to favor them, by dragging your legs instead of bending your knees. When you start to drag your legs you may temporarily alleviate the pain, but in a short time things will start to go down hill and pain and stiffness will escalate.
The walker and the cane, you need them big time!
 The
walker is used immediately after surgery and make sure again you have one to
go home from the hospital with. It
is not long after the therapist
will or should encourage the patient to give up the security of the walker
and the wheel chair for a straight cane. Make sure it is adjustable
and read the instructions thoroughly as there is a proper height setting
relative to the patients height.
The
walker is used immediately after surgery and make sure again you have one to
go home from the hospital with. It
is not long after the therapist
will or should encourage the patient to give up the security of the walker
and the wheel chair for a straight cane. Make sure it is adjustable
and read the instructions thoroughly as there is a proper height setting
relative to the patients height.
It appears we hung on to the walker too long and lost some valuable time in balancing as the cane if handled right will provide an almost immediate path to balancing and consequently freedom from anything.
Using a walker as a "crutch" makes sense when the patient is really unsteady on their feet from the trauma of the operation, but there comes a time when the cane is the ticket. Don't get hooked on the walker let alone a wheel chair. Note, when you first go to the cane, keep the walker handy especially for going up and down steps. We used the walker very successfully at night when using the potty. Sliding off the bed, gripping the walker turn 45 degrees and backing into the potty worked like a charm, because making it to the bathroom for a week or two is not possible for most patients.
A few pointers on the cane that
were somewhat surprising. The therapist when viewing my wife walking
with the cane for first time said "Why are you using your right hand
with the cane?"
Now it would seem logical that first my wife being right
 handed
and having her right knee replaced that she or anyone for that matter would
deploy the cane on the right side using the right hand, right? Wrong! Unless you have been exposed to the
phenomena of the cane, if you seen someone walking down the street with a cane
in their right hand, you would or at least I did, automatically believe the
individual had a problem with the right leg. NOT SO! Now this may
not seem to be relative to the problem of recovery, but my wife and I have
studied this issue to the point of obsession. We have because we now know
that this issue is so critical in the physical and mental recovery of a knee
replacement patient. You could spend weeks and weeks doing the wrong thing
and that is why you may have to read the below information over and over again,
along with experimentation to really get a handle on this.
handed
and having her right knee replaced that she or anyone for that matter would
deploy the cane on the right side using the right hand, right? Wrong! Unless you have been exposed to the
phenomena of the cane, if you seen someone walking down the street with a cane
in their right hand, you would or at least I did, automatically believe the
individual had a problem with the right leg. NOT SO! Now this may
not seem to be relative to the problem of recovery, but my wife and I have
studied this issue to the point of obsession. We have because we now know
that this issue is so critical in the physical and mental recovery of a knee
replacement patient. You could spend weeks and weeks doing the wrong thing
and that is why you may have to read the below information over and over again,
along with experimentation to really get a handle on this.
Now all you would have to do to "go to school" on this issue is grab a cane and start to simulate a walking patient. You will immediately discover that holding the cane and deploying it with your opposite hand (opposite to the leg that you are favoring, the operated leg) will take the pressure off of the involved leg, not only on the step forward, but on the backward motion and bend of the leg. Yes, holding the cane in the opposite hand does the trick. Try it! It is like a third leg.
So what do you do? WEAN YOURSELF OFF OF THE CANE, A.S.A.P. Although the therapist may want you to hang on for a short while with the cane so that you do not put excessive pressure on your hips.
Anti-inflammatory
We had an experience with pain
medications during the rehab process and recently learned that after we got
off of the heavy stuff, Vicadin etc. we went back to an over the counter
medication for Arthritis. We were told by the surgeon to go on Aleve for discomfort of the
knee that was not operated on. Aleve is a true anti-inflammatory and
we believe would serve the anti-flammatory aspects of a new replacement.
We would advice seeking advise from your surgeon regarding your individual
needs.
You could be on Coumadin for blood
thinning as there is always the potential for blood clots. The dosage
etc. will be in the hands of your nurse who reports test results twice a
week to the surgeons office who promptly adjusts the dosage if necessary.
This could last 4 to 6 weeks. In fact Coumadin may have to be taken
after your in house nurse releases you, and you will either have to go to
the hospital lab for a few weeks or have your GP do what they refer to as
the PT/INR that tests the thickness of your blood etc.
The Bike
We purchased a recumbent bike after we were well into home therapy on the first knee. If we would have known we would have purchased one before surgery and had it ready once the therapist gave us the go ahead. In fact the therapist on our first knee had a little portable bike where you sat in one of your own chairs and put your feet in the portable. It was better than nothing, but a good recumbent bike is really the way to go. The back support is great, the adjustment on the lower bar is critical, nice little fan, the one we have has a resistance setting.
Keep in mind that investing in a recumbent bike is not just for temporary post surgery it has to be used forever as doing a knee replacement/replacements requires a life long regimen to keep things in top shape.
We have ours right in the dining room of our house. The therapists on our second knee put my wife in it every time they came with the other therapy they did. Cycling that knee eventually all away around (full cycle) and having the apex of the flex up around 90 degrees really prepares the patient for the other therapy. It makes the other therapy more tolerable as this isn't a piece of cake folks. A recumbent bike puts the CPM machine to shame, although again there is short period where the CPM is invaluable in our opinion.
We purchased a recumbent bike to replace the CPM when our therapist told us it was time. Don't get hung up too long with the CPM machine as we did. It is not as easy to use and after about a week you are wasting valuable time where you should be doing things that are more strenuous and beneficial than what the "passive" CPM can do for you.
Our surgeon on the second knee procedure wouldn't even write us a script for a CPM. He said he would prefer taking the time and using your own muscles rather than the passive aspects of the CPM. Now again the CPM has its place right after surgery and we believe if handled right can serve as a warm up to serious therapy sessions. We couldn't convince the surgeon of this and guess what we believe now he was right. A recumbent bike that can increase resistance and build up your quads etc. is what you need and getting around full cycle with the peddles is important as well.
You could get lucky and find a used recumbent bike, but the chances are not that good. Don't settle for a regular exercise bike as they are not what you need to rehab.
Get this one?, I asked the
salesman how much would they want to put the bike together and he said 200 bucks as much as the bike
itself cost. I was literally floored. After you put one
together and you better do it methodically by arranging all the parts on the
floor with notes etc. you will appreciate why they have to get 200 bucks
to put one together. Hint: This goes for any of these fabricated
nightmares you get in a box with a bunch of bolts. In arranging this
affair make a paper note
 of every group of parts, nuts, bolts, clips what have you. Write the part on the note by referring to the parts list.
Most of these parts lists have picture in their actual size. Put
them all on the piece of paper and write the part and part number.
Make sure you have the count they give you on the parts list. You
start assembling parts and use the wrong ones, you will be in deep doo doo
in a hurry and pulling your hair out. After you inventory the count
of each part and you are short a part or two take the part/parts to the
Home Depot or Lowe's and buy the exact part that was short. Don't
waste time belly aching to the store you bought the bike from because some
pin head did not give you an accurate count.
of every group of parts, nuts, bolts, clips what have you. Write the part on the note by referring to the parts list.
Most of these parts lists have picture in their actual size. Put
them all on the piece of paper and write the part and part number.
Make sure you have the count they give you on the parts list. You
start assembling parts and use the wrong ones, you will be in deep doo doo
in a hurry and pulling your hair out. After you inventory the count
of each part and you are short a part or two take the part/parts to the
Home Depot or Lowe's and buy the exact part that was short. Don't
waste time belly aching to the store you bought the bike from because some
pin head did not give you an accurate count.
Summary
1. Prepare for your operation in advance
2. Cushion your feet on hard surfaces now.
3. Pick a good surgeon. Pick a good hospital to do the operation that could lead you to the good surgeon. There are good surgeons and superstars.
4. Have your GP on top of the whole affair from start to finish. Don't rely on the surgeon to take care of all the details, he is under a lot of pressure. You may have to have an in house Doc see you every day, the surgeon will find you one.
5. Post surgery flaws there are many. Go back in the feature and read them again.
6. The ice wrap machine. Understand how it works before the operation, you may be the only one that knows how it works properly, especially at the critical period right after surgery.
7. Have a walker delivered to the hospital bed at least a day before release, so you have it to get home with that day. Chain it to the bed so that the hospital staff knows it is yours.
8. Have the portable potty delivered to your home in advance. Buy an extra one as we recommend 2 portable potties if you have two bathrooms. The handles on these portables are invaluable. Keep in mind these potties are flexible. You can either have a close potty for night business or an open potty to the bowl.
9. Monitor and understand the Morphine dosage. If you rely on the nursing staff, you could be sucking wind. My wife even with the restricted dosage method they had for her was overdosed, twice as much as she should have had and the second night went delirious. It was a good thing our oldest daughter was there as my wife started to remove all of her wires and tubes and said she was "getting the hell out of here" Keep a chart of all medications given and what time they are given. Review them with the staff, your Doctors and the janitor too.
11. Emphasize with the Doctor that you want an early release during the day. It they want to release you at night tell them to go to hell and back. You may have to settle for early evening.
12. The Great Escape. Every one is so glad to get out of the hospital they do not plan. We did not plan. We were ignorant of the snake pit we were entering. Get your ducks in order, go back in the feature and read them again Houdini. Make sure you have the Doctor/surgeon give you a script for the pain meds a few days before release from the hospital. Don't wait in a pharmacy parking lot for an hour like we did.
13. Range of motion. This along with communication to your nerves and moving parts will be the biggest challenges of your life. Concentrate on mobility the sooner the better with both legs. It is critical. You can do it. Be understanding with the patient, this is an enormous issue and lots of love will conquer it.
14. Home therapist. Interview a few, don't take pot luck. Some are dedicated, some not. Some use the excuse that they don't want to push you, when the truth is they are lazy because other than the patient there is no one that monitors their efforts.
15. The bikes. There are many different versions. With knee replacement and the stiffness you will have for the rest of your life you need a good bike ride every day besides the rehab center bikes. We recommend a recumbent bike.
16. Rehab facilities. One of the most important factors in your recovery. In metropolitan areas there are multiple facilities. You should be able to choose one. Visit the facilities before hand. We had a good one, the Memorial Regional East in Hollywood Florida. Great people and we owe our remarkable recovery to them along with a great surgeon.
17. Don't rely on a treadmill that is in a part of the building you are in or a facility on the other side of town. Put one in your home anywhere you can place it, where you can see it and remind you to use it. It is that important. Include a good recumbent bike. Buy it before the operation, you will use it soon after getting home and for the rest of your life.
18. If you leave a loved one alone for 1 minute in a hospital, have your head examined. I left my Mother for a few hours with a broken hip. I came back to find her dead and that I will carry to my grave.
Below is our recommendation for home therapy. It is a limited amount of methods compared to the amount of methods thrown at you from all angles before you are officially released. We certainly would clear this post home regimen with your therapist while doing professional rehab and perhaps after as we certainly are not qualified to recommend a specific regimen for you.
Every patient requires certain exercises for their particular condition and only a qualified therapist can make that judgment. In other words make sure the therapist knows what you are doing, don't keep it a silly secret. Again this is what we do, between rehab sessions and most likely after we finish rehab and retreat exclusively to the home.
A. We rely on our exercise Recumbent Bike for loosening up to start our sessions. Most therapy professional sessions are preceded with a bike.
B. On the couch with the 1"by 6" Board for quad sets, getting the back of the knee down on the hard surface (You can do it). You can also use the board for slides, where with a sock you can slide your foot back and get a real good flexion.
C. In addition to the quad sets while on the couch using some Ankle Weights, a few pounds, we do leg Raises in different modes, laying on your back leg raises, laying on your stomach leg raises and side leg raises. Make sure you get professional guidance before you do any of these exercises.
D. The Step for flexion bending and some extensions, but primarily flexion bending. Keep in mind the better degree of range of motion you achieve on both flexion and extension, the better you will walk and the better your overall health will be for the rest of your life.
E. A Treadmill is one of the best exercise machines you can rehab at home with. It is excellent to deploy heel to toe motion, as well a flailing your ankles back comfortably that will not only improve your walking, but also move wastes up from your lower extremities from the specialized designed pumping action of the foot. Wastes are moved by the lymph and the lymph does not have the luxury of a pumping heart. The heart delivers the nutrients to the cells of the body via the lymphatic network. It is only the lymphatic net work that rid the waste.
If there are any questions that we can help you with do not hesitate to call us before 8:30 P.M. EST. 954-922-9181
Below is the link for this feature if you want to share or view it on our website. Please feel free to pass this information out to anyone you choose. The link is http://www.blueeyedcurse.com/Kneereplace.htm
In addition to this knee replacement feature we have a feature http://www.blueeyedcurse.com/knees.htm that covers many ways that you may be able to avoid "The last resort" surgery.
Before you pump yourself with dangerous high powered pain killers for years the way we did, keep your options open and replacement is in some cases a good option in our opinion.
This information is intended to heighten awareness of potential health care alternatives and should not be considered as medical advice. See your qualified health-care professional for medical attention, advice, diagnosis, and treatments.